|
| EWD Projects :: Oldschool |
|
|
|
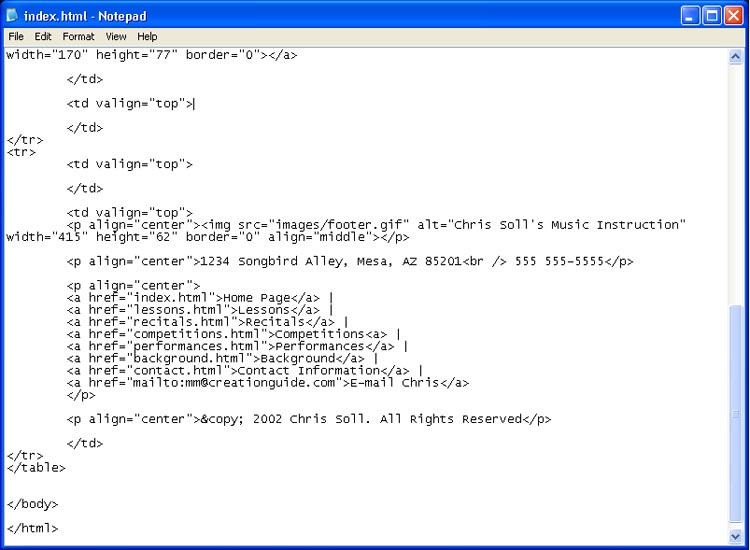
Demystifying Basic HTMLInserting Footer InformationPrint This Procedure ( doc :: pdf ) You next need to add the footer information. The music site’s footer includes a footer graphic, the address and phone number information, text links that correspond to the navigation bar links, and some copyright text. The process of inserting a footer graphic is similar to the process of inserting the header graphic described earlier in this lesson. The main difference in the footer area is that you’re going to place the footer graphic in the second cell in the third row and you’re going to insert some additional information in the cell along with the graphic (as described in the ). Because you’re going to include other information below the footer graphic, you’ll nest the footer graphic within paragraph tags (<p></p>) to ensure that space will be included above the graphic. Let’s start to create the footer element by inserting the footer graphic: 1. If necessary, open your text editor and open index.html. 2. In the third row of the table, click after the second <td valign="top"> tag, press Enter, press Tab, and then type <p align="center"> to indicate the start of a paragraph and to specify to center align the paragraph’s contents. (By default, paragraphs are left-aligned.) 3. Specify the footer image’s information by inserting the image tag with the following attributes: <img src="images/footer.gif" alt="Chris Soll's Music Instruction" width="415" height="62" border="0" align="middle">
4. Type </p> to indicate the end of the paragraph section. Next you’ll insert a second paragraph that centers the address and phone number information. 5. Press Enter twice, press Tab, and type: <p align="center">1234 Songbird Alley,
Mesa, AZ 85201<br />
Notice the <br /> tag in the preceding HTML code between the address text and the phone number. Adding the <br /> tag inserts a line break and displays the phone number below the address on the next line. Now you’ll add some text links in the footer area that correspond to the navigation bar’s buttons that way, if any users have graphics turned off, they can still navigate around your site. To add text links, you follow a procedure similar to creating graphic links. The difference between the two tasks is that you enclose text between anchor links instead of enclosing an IMG tag, as shown in the following steps. First, you’ll center the paragraph that will contain the text links. 6. Press Enter twice, press Tab, and type <p align="center">. 7. Press Enter, press Tab, and type: <a href="index.html">Home Page</a> |
In the preceding link, the words Home Page will display as hypertext on the Web page. If users click the words Home Page, the index.html file will display. Also notice the pipe symbol (|). You type this symbol between each text link to make differentiating the links easier. The symbol is optional but popular. You’re now ready to add the remaining text links. tip You don’t have to press Enter and Tab between each of the text link entries in steps 8 through 14. Browsers will show the links in a row regardless of the space you add in the HTML document. We chose to format the text links in the described way to make working with the information easier. 8. Press Enter, press Tab, and type: <a href="lessons.html">Lessons</a> |
9. Press Enter, press Tab, and type: <a href="recitals.html">Recitals</a> |
10. Press Enter, press Tab, and type: <a href="competitions.html">Competitions<a> |
11. Press Enter, press Tab, and type: <a href="performances.html">Performances</a> |
12. Press Enter, press Tab, and type: <a href="background.html">Background</a> |
13. Press Enter, press Tab, and type: <a href="contact.html">Contact Information</a> |
The final text link entry is the text equivalent of the Send Us A Note icon you inserted earlier. Thus, this text link uses the mailto: component in the href attribute. Remember to replace username@domain.com with your own e-mail address in the following step. 14. Press Enter, press Tab, and type: <a href="mailto:username@domain.com">E-mail Chris</a>
15. To complete the text link paragraph, press Enter, press Tab, and type </p>. The final component of the footer is the copyright information. In this section, you create a centered paragraph and enter the copyright information. One interesting twist here is that you can use a special character entity reference to create a copyright symbol. 16. Press Enter twice, press Tab, and type: <p align="center">© 2002 Chris Soll. All Rights Reserved</p>
17. Save index.html. Your HTML code should look similar to the code shown the following figure.
Footer information in the last cell in the table 18. Open index.html in your browser. The footer in the index.html file should look similar to the footer information in the page shown in the following figure.
HTML footer code interpreted by a browser You might have noticed that you’ve designed everything on the home page except the main content. You’ll be happy to hear that there’s a method to our madness. Now that you have the basic structure of the home page created, and because you’re planning to mimic the home page structure on the subpages, you can use the index.html file to quickly create the foundation pages for the subpages, as described in the next section. |
|
 |
|
|